How to install a walk-in tub in 10 steps
Standard walk-in tub installations typically finish in one to two days.
More complex projects involving bathroom modifications or custom-fit tubs may take three to five days, according to Dean Christian, Plumbing Operations Manager at Awesome Home Services in Colorado Springs, Colorado.
Following is our guide to installing a walk-in tub in ten steps.
1. Obtain multiple quotes
Reputable contractors perform in-home consultations to provide accurate project quotes. Quotes should include costs for the tub, materials, labor, permits, demolition, waste removal, plumbing, electrical work and any structural changes.
Get quotes from multiple contractors before committing, and ask questions about everything from how the walk-in tub will get installed to what you can expect after installation.
2. Measure and prep your space
Whether you do it yourself or have installers help you, get measurements of the existing and new tub, pathways, hallways, door frames and the overall bathroom space.
John Akhoian, Founder of Rooter Hero Plumbing & Air, also recommends clearing your bathroom of items like floor mats, wastebaskets and toiletries.
Additionally, turn off the water and drain faucets and the toilet. Ensure the electrical panel and water shut-off valves are readily accessible. Akhoian notes, “Your installation team will likely need to access both during the installation.”
3. Remove and dispose of the old tub
After preparing the pathways, shutting off the water and disconnecting the plumbing, installers remove the old tub.
Emmanuel Kavouklis, President of CMK Construction, Inc., a Tampa Bay, Florida-based home remodeling company, explained, “Sometimes the old tub comes out in one piece. Other times, especially with cast iron or older installs, it has to be cut or broken down carefully. This becomes a larger demo and takes longer.”
Prior to demolition of the old tub, the installers should apply plastic sheeting or ram boards to floors and work areas to protect your home.
Ram boards, usually made of recycled materials, provide heavy-duty protection and are preferentially used by contractors.
4. Inspect the bathroom
Next, installers inspect the overall condition of your bathroom. According to Kavouklis, “This is the point where you often find hidden issues. Water damage, old plumbing, uneven framing or a weak floor can all show up once the old unit is removed.”
A proper inspection includes checking:
- Structural support of the room
- Plumbing location
- Electrical access
- Water heater capacity
- Drainage
- Waterproofing
- Code compliance
Kavouklis explained, “A good contractor does not just cover those problems. They address them before the new tub goes in.”
5. Perform electrical checks and upgrades
Walk-in tubs typically require at least one dedicated 120-volt, 20-amp, GFCI-protected circuit for safe operation. The wrong equipment — or improperly installed electrical work — can pose serious, even deadly, hazards.
A licensed electrician will perform necessary electrical checks and upgrades, and ensure proper handling and compliance with local codes and manufacturer specifications.
A ground fault circuit interrupter (GFCI) is a safety device that shuts off electricity if it senses water contact.
6. Reconfigure plumbing
You may need to upgrade your home’s plumbing and add new lines to complete your new tub’s installation.
Walk-in tubs typically require high-flow faucets and specialized drains to reduce fill and drain times while you wait in the tub. Christian noted that “drain assembly requires reconfiguring, and water supply lines need to be moved to match the tub's faucet location.”
You may also need a larger hot water heater — most walk-in tub brands recommend 50 to 80 gallons.
7. Set and level the tub
Incorrect leveling of the tub can affect door sealing and overall performance.
“This can cause water drainage issues, causing water to pool and become moldy, and can cause the unit to warp from being misaligned. It can also lead to structural damage from failed sealant due to increased stress,” said Christian.
Your contractor should position and level the tub using the unit’s adjustable feet and shims.
Shims are thin pieces of material — usually made of plastic, wood, or metal — used to make surfaces level.
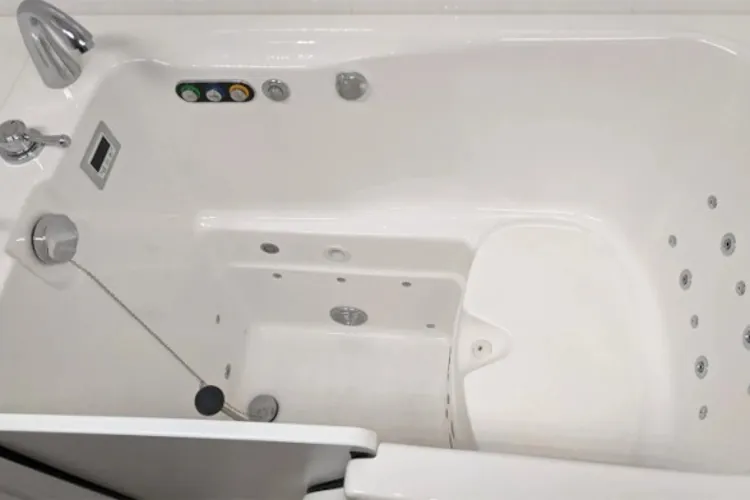
8. Install fixtures and panels
Once the tub is level and secure, fixtures and controls are installed. Fixtures often include faucets, handheld showerheads and drains.
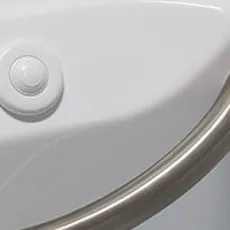
Depending on the brand, your walk-in tub may also have a digital touchpad, raised buttons or a water-resistant remote to control various features such as jets, lighting and heated seats.
Installers verify all connections are watertight and aligned.
9. Conduct seal, cure and leak test
After applying sealant around seams and edges, the installers must allow it to cure per the manufacturer instructions. Afterward, the contractor will perform a leak test by filling the tub and checking all fixtures and seals for seepage or moisture.
Testing the installed tub to rule out leaks and ensure it’s safe to use is critical.
“We will do a flood test to check for leaks at the drain and overflow gasket, and will run water through the pipes to inspect all connections to make sure there aren’t any leaks,” said Christian.
10. Perform final inspection and cleanup
Once the tub is deemed safe and functional, your contractor should conduct a final walkthrough with you, reviewing the tub’s benefits, how it works and what you can do to maintain it.
The installers should also haul away any old tub pieces, debris, packaging and materials.
» EXPLORE: Best walk-in bathtubs
Walk-in tub installation requirements
Key installation measurements include bathroom space, plumbing and electrical connections, as well as structural support.
Measurements and clearances
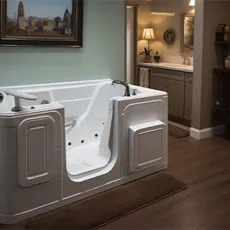
Most walk-in tubs are made to fit into a standard 60-inch-long tub space.
However, walk-in tubs are much taller: Standard tubs are 14 to 16 inches tall, while walk-in tubs are at least 38 to 40 inches tall.
The measurements you need for your project will depend on the type of walk-in tub and the manufacturer’s instructions. Generally, the more advanced the unit and the more features it has, the more complex the installation can be.
Key measurements you will need include:
- Doorway widths and heights
- Pathway and hallway widths
- Old and new tub length, width and height
- Length, width and height of the tub alcove
- Bathroom ceiling height
- Location of drain and water lines
- Electrical circuit or panel location
Clearance measurements include:
Bathroom doorways
Typical bathroom doors are 30 to 34 inches wide. Standard walk-in tubs are about 28 to 32 inches wide. More spacious models can be up to 40 inches.
“Accurate measurements are critical for a smooth installation. I recommend working closely with your plumber to ensure you purchase the appropriate tub for your space,” Akhoian explained.
If your walk-in tub is too large to fit through the existing doorway, the installer may need to remove or widen the doorway. This is especially common in older homes with narrow bathroom doors. The process may include:
- Removing the door, hinges, frame, trim, etc.
- Adding a support beam if the wall is load-bearing
- Cutting the wall stud and drywall until the opening is wide enough
- Reinstalling or replacing the door frame, door, trim, etc.
- Patching up the drywall and repainting
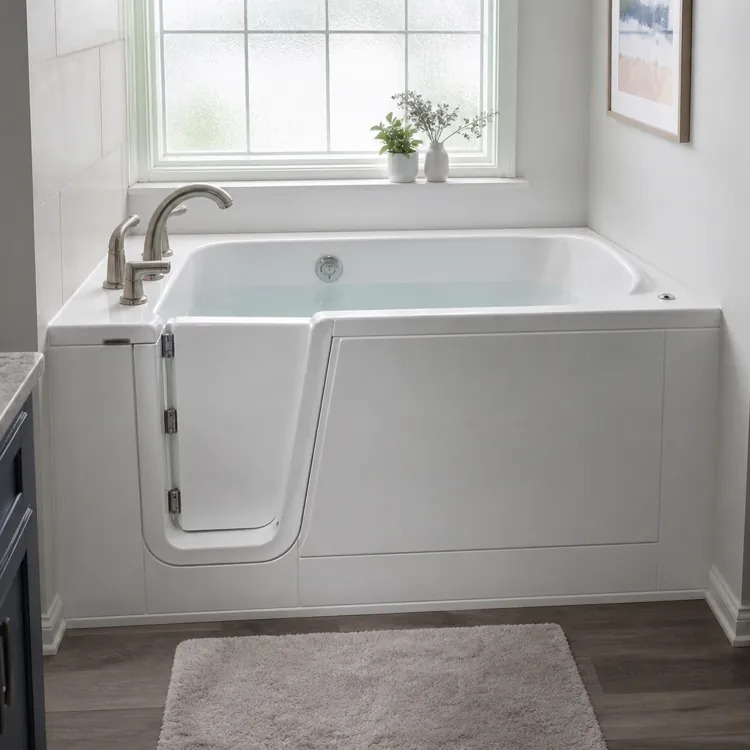
Walk-in tub door
Walk-in tub doors may swing inward or outward. If your tub’s door swings outward, be sure to allow at least 1.5 to 2 feet of clearance for the door to open and close, plus extra room for safe entry and exit — especially if you use a wheelchair.
Plumbing and electrical
Plumbing rough-in
The manufacturer of your walk-in tub will provide a spec sheet with all necessary measurements for ensuring that the water lines, hot and cold valve placements, drains and overflow match with the tub’s fittings.
One of the most common and costly DIY mistakes Akhoain sees is miscalculating the plumbing rough-in — another reason hiring professionals for your walk-in tub installation is often the more cost-effective option.
"Rough-in" refers to moving pipes or lines to the right place prior to final connection.
Electrical circuit and GFCI needs
Walk-in tubs need at least one dedicated 120-volt, 20-amp, GFCI-protected circuit. Tubs with high-power features, such as rapid draining or a whirlpool system, may require two or more dedicated circuits.
Always check the manufacturer’s electrical specifications before installation.
Subfloor condition and leveling
Once the old unit is removed, it’s important to inspect the subfloor for any signs of deterioration, such as mold, rot or water damage.
A walk-in tub can weigh over 1,000 pounds when filled, which is significantly heavier than a standard bathtub. Any weak or damaged areas in the floor or subfloor must be repaired and reinforced before installing the new unit.
The floor must also be perfectly level to ensure the tub functions and drains properly.
The industry standard is a tolerance of no more than 1/8-inch variation over a span of four feet where the tub will sit. If the floor slopes too much, water won’t drain correctly. This can lead to mold and slip hazards. Heavier walk-in tubs may call for additional support underneath for stability.
Check with your installation manual for subfloor prep instructions and requirements.
A subfloor is the structural surface beneath your bathroom’s floor covering.
Walk-in tub installation time and cost
The installation of a walk-in tub typically takes one to two days, depending on the complexity of the project and the amount of prep work or construction required. According to Christian, professionals can usually complete a standard tub installation within 6 to 8 hours if everything goes smoothly.
However, installing units with advanced features or running into unexpected issues can extend the time by several days.
“Replacing an existing walk-in tub with a new one of the same size will generally be quicker than installing one where none existed before. Additionally, if the installation requires running plumbing lines to a new area, the project can take longer,” said Akhoian.
Costs for different components and labor, including common factors that affect both:
| Common costs | Price factors | |
|---|---|---|
| Old tub removal | $300 to $500 | Heavy cast iron tubs or those that need to be cut or broken down in order to remove |
| New tub unit | $2,000 to $20,000+ | Tub type and features of the unit, ranging from a basic soaker to luxury models with heated seats, jets, lights, aromatherapy, etc. |
| Demolition | $200 to $1,500 | Bathroom accessibility, tub material and weight; removal of surrounding tile, walls or doorways |
| Plumbing labor | $1,000 to $3,500 | Moving or reconfiguring drain lines, replacing old or incompatible pipes and overall project site accessibility |
| Water heater | $800 to $3,000 | Upgrading the water heater to one that can accommodate a 50- to 80-gallon tub |
| Electrical labor | $500 to $2,000 | Panel accessibility, installing new GFCI circuits and wiring complexity of features such as heaters, jets, lights, etc. |
| Structural work | $500 to $1,500 | Doorway removal and widening; carpentry requirements such as drywalling, finishing, replacement frame and trim, tiling or adding load-bearing beams |
| Floor reinforcement | $300 to $3,000 | Level of reinforcements needed — from bolstering floor joists to adding wood braces or support columns to creating mortar bedding |
| Permit fees | $100 to $500 | Location; complexity of the electrical and plumbing work required; inspection fees |
» MORE: How much do walk-in tubs cost?
Mistake to avoid when installing a walk-in tub
Installation mistakes can be extremely costly — and even dangerous.
DIY installation mistakes to avoid
Here are some of the most common errors contractors see during DIY installation.
Incorrect measurements
Failing to accurately measure door frames and bathroom space can result in a tub that won’t fit. “If you are not confident in your own measurements, have a professional help you,” Akhoian said.
Insufficient floor support
Adequate structural support — required by municipal building codes and ordinances — is key to assuring your walk-tub is safe and functional.
When filled, a walk-in tub is significantly heavier than a standard tub. The floor must be able to support its weight to keep the tub level and prevent structural damage. Without proper support, the subfloor can sag or fail over time, creating hazards and increasing the risk of injury.
Christain explained, “I would advise consulting a structural engineer to be absolutely sure [of adequate structural support]. But to get very mathematical, you can calculate whether the total load (tub, water, bather) is over 40 to 50 pounds per square foot, which equals standard residential framing capacity.”
Faulty electrical work
Walk-in tubs require dedicated GFCI circuits. If the electrical installation is not done properly, causing faulty wiring or poor grounding, it can trip breakers and create serious safety hazards — including shock or electrocution.
Noncompliant electrical wiring may also violate building codes and result in failed inspections or expensive rework.
Improper plumbing
Incorrectly installed pipes, drains or seals can cause drainage problems and leaks that may affect the floor or rooms below.
Not leveling or sealing properly
According to Christian, improper leveling of your tub could cause water to pool and encourage mold or even cause warping from misalignment.
Always allow adequate curing time for sealants before testing or using your new walk-in tub. Insufficient caulking can enable water to seep behind walls, risking structural damage over time.
Not upgrading to a high-capacity water heater
Most walk-in tub brands require a water heater capable of heating at least 50 gallons to ensure a warm and comfortable bath. The last thing you want after installing a new tub is to have an unpleasant, chilly or lukewarm bath.
Incomplete testing
Always perform a pre-installation water test of the new unit to ensure there are no manufacturing defects. Once the tub is installed and sealed, carry out a final test to make sure everything works properly.
“We will do a flood test to check for leaks at the drain and overflow gasket, and will run water through the pipes to inspect all connections to make sure there aren’t any leaks,” said Christian.
Confirm that all features work correctly before making the final payment to your contractor.
Ignoring local codes
Attempting complex installations that involve plumbing or electrical modifications without proper licensing or experience can create problems during inspections — and during a future sale of your home.
Be sure to obtain the required permits in advance. Many manufacturers require professional installation. Otherwise, you risk voiding your warranty.
Why choose professional installation over DIY installation?
Professional installation can give peace of mind and ensure your tub functions safely and properly. It is recommended over DIY approaches for several reasons:
Warranty
“People underestimate how easy it is to void a warranty. Improper installation or the use of an unlicensed professional can void a warranty, and if there are any issues, you’ll be out of luck. It’s really not worth the risk,” Akhoian emphasized.
Safety
Safety is a top priority when installing a walk-in tub. Improper installation can be extremely hazardous.
Unless you have advanced skills in demolition, carpentry, plumbing and electrical work, it’s best to hire a professional. Licensed installers have the proper tools and experience to safely lift and maneuver heavy components — decreasing the risk of personal injury.
Long-term costs
If your walk-in tub is not installed correctly, it can lead to costly issues down the road.
“We have been called in many times after a rushed or improper installation. The homeowner ends up with slow drainage, leaks, poor access or a tub that does not feel safe. At that point, fixing the problem can cost more than doing it correctly the first time,” Kavouklis explained.
Time
Professionals can usually get the job done in just one to two days, saving you significant time. They know what steps to take, can efficiently address and resolve issues, possess the necessary tools and supplies and know how to handle permitting and inspections.
FAQ
Are walk-in tubs hard to install?
Walk-in tubs can be difficult to install due to the unique electrical and plumbing requirements of each project, as well as possible structural modifications to doorways and bathroom layout. Professional installation is highly recommended due to these complications.
Does Medicare pay anything toward a walk-in tub?
Medicare does not cover walk-in tubs. Walk-in tubs are not classified as durable medical equipment (DME), which is equipment deemed medically necessary. Walk-in tubs are instead considered home improvement or comfort items.
However, certain private plans, such as Medicare Advantage (Part C), may offer partial coverage, though this will vary by insurer.
What electrical requirements are needed for walk-in tub installation?
Walk-in tubs require their own dedicated circuit, usually 120 volts and 20 amps. The necessary voltage will depend on the tub’s features, such as jets or heated seating. A Ground Fault Circuit Interrupter (GFCI) is mandatory for preventing electric shock.
Can I install a walk-in tub by myself?
If you have advanced plumbing, electrical and carpentry skills, installing a walk-in tub yourself is possible. However, it’s highly recommended to hire professional contractors. It’s safer, and many manufacturers require a professional installation to keep the warranty valid.
“A walk-in tub can be a great investment, but only when it is planned properly. The product matters, but the installation matters just as much,” said Kavouklis.
Do you have to sit in a walk-in tub while it drains?
Yes, the door to your tub must stay closed while it drains to prevent water from flooding into the bathroom. The water level should drop below the bottom of the door threshold in order to open it safely. Walk-in tubs commonly feature quick-drain systems to speed up this process.
Article sources
ConsumerAffairs writers primarily rely on government data, industry experts and original research from other reputable publications to inform their work. Specific sources for this article include:
- Lowe's Companies, Inc., "Walk-In Bath Installation Instructions and Owner’s Manual." Accessed May 10, 2026.
- Horow, "How to Level a Freestanding Tub: Step-by-Step Guide to Prevent Leaks." Accessed May 10, 2026.
- Horow, "How to Install a Bath Tub: 2025 Pro DIY Guide." Accessed May 10, 2026.